|
This page will be all about setting up a new user in the system. We will go through how to create a new staff record, how to set up security, and user profile constraints. |
•Assigning security permissions against the Staff record
•Assigning the skills and groups against the Staff record
•Configuring Profile Constraints
To create a new application user, please follow the instructions below:
Login to the main application, on the module menu, expand Staff and click on the [ Staff Details ] option.
On the Details form, fill in all of the required fields marked with a red asterisk*, the rest of the fields are optional.
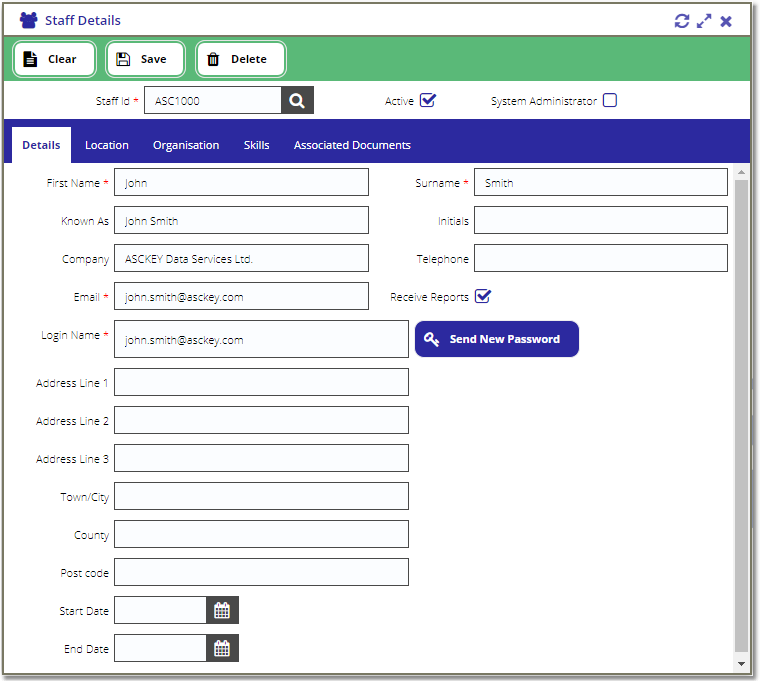
Important Field Information:
Staff Id |
This is the Staff identifier, this needs to be unique per user. Typing in an existing Staff Id will load the user details associated with the Id.
|
Login Name |
This is the login name used to login on both the main application and mobile application. This field also needs to be unique as typing in a login name already used by another user will result in a validation error.
We advise using the user's email address as a login name, as this is guaranteed to be unique across the Trust and NHS mail servers.
|
System Administrator |
This field is hidden by default. It will only become visible once the Staff record is created and if the logged in user has the System Administrator flag checked on their Staff record.
This flag will enable the user to see the [ Unlock Account ] and [ Send New Password ] buttons on the Staff Details view.
|
Receive Reports |
Check if the Staff should receive the automated reports.
NOTE: There are extra configurations required for the Staff to start receiving reports, this field is just one of them. This will be explained on the Setting up Automated Reports section. |
Once the Staff record is created, the [ Send New Password ] button should become visible on the Details form next to the Login Name field. Clicking this button will send an email to the address defined in the Email field e.g.:
A new account has been set up
Login Name : john.smith@asckey.com
Password : 123SamplePassword!
From Date : 02/12/2019 11:52
Please do not reply to this email as the inbox is not monitored.
The Location/Organisation tabs on Staff Details view allows the user to assign a Staff record against specific location/organisation tiers. Navigate to the tab and expand the Location/Organisation tiers that you want to assign the user to and click on the Selected column checkbox e.g.:
If you want to assign the user to the whole Site, click on the Selected checkbox against the site:
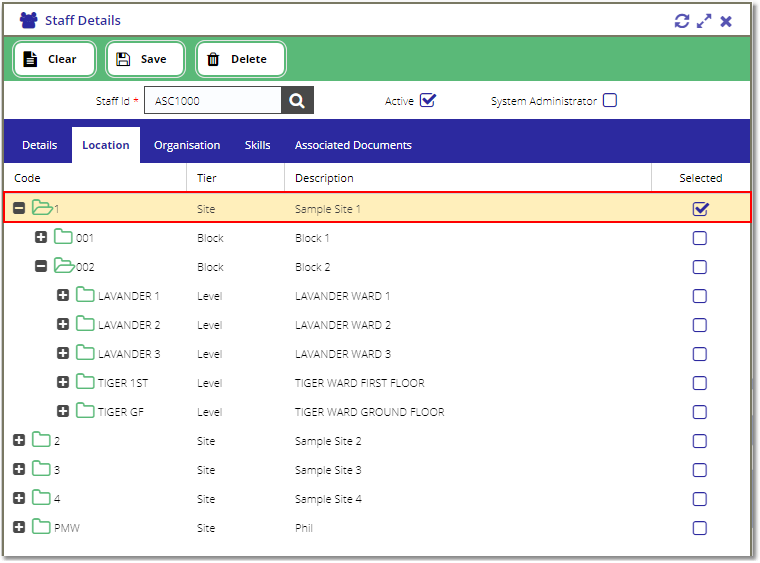
If Automated Reports are configured and Receive Reports flag is checked, assigning a Staff record against the whole site means every time an audit is signed off on one of the functional areas against the site, the user will receive an automated report for that functional area.
Alternatively, if you want to assign the user to specific blocks or functional areas, deselect the Site and drill down until you find the block or functional area and select them instead:
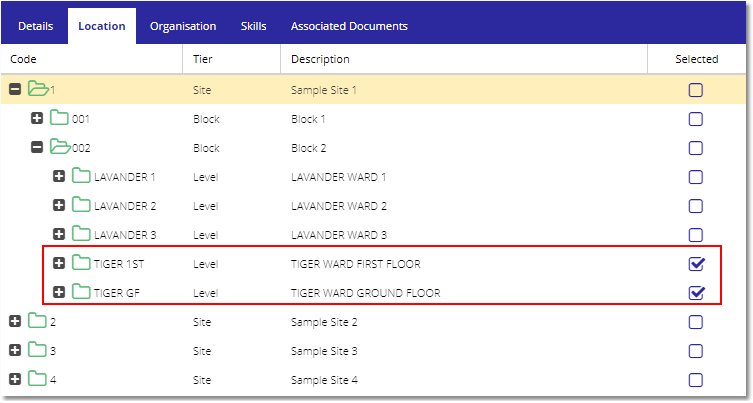
Selecting TIGER WARD FIRST FLOOR and TIGER WARD GROUND FLOOR on the location tree means that the user will only get automated reports for the two functional areas.
Assigning security permissions against the Staff record
To give view permissions to the user, go to Staff > Staff Details view.
Load the Staff ID from the Staff Lookup, then navigate to the Access Rights tab:
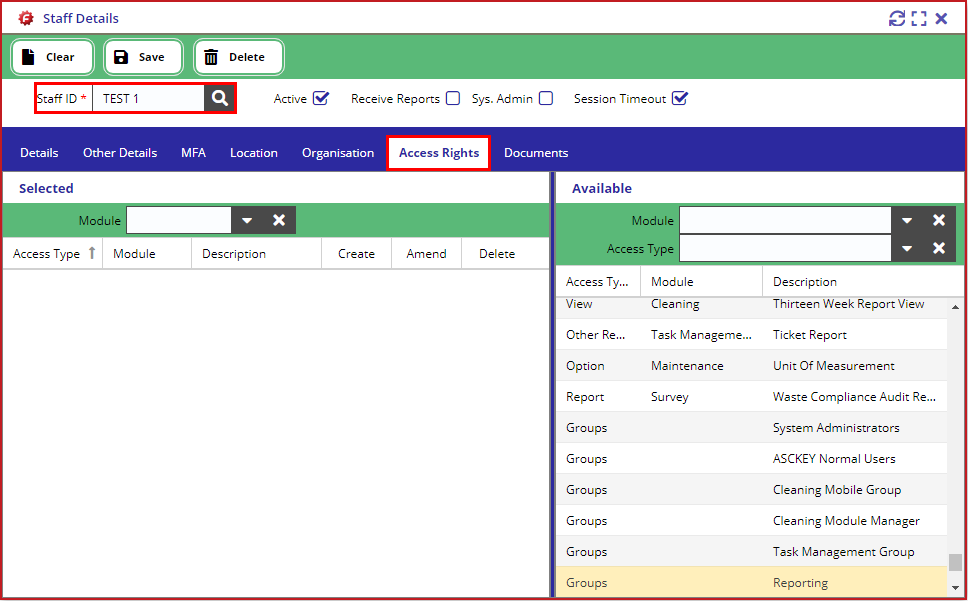
The items in the Available grid are the available permission rights that you can assign to the user.
You can use the Module or Access Type filter to find the security permission for the user.
You can either assign individual permissions to the user or give the user Group permission (please see the How to Create Group Permissions section to find out more).
Select row/s from the Available list and DRAG and DROP the row/s to the Selected list:
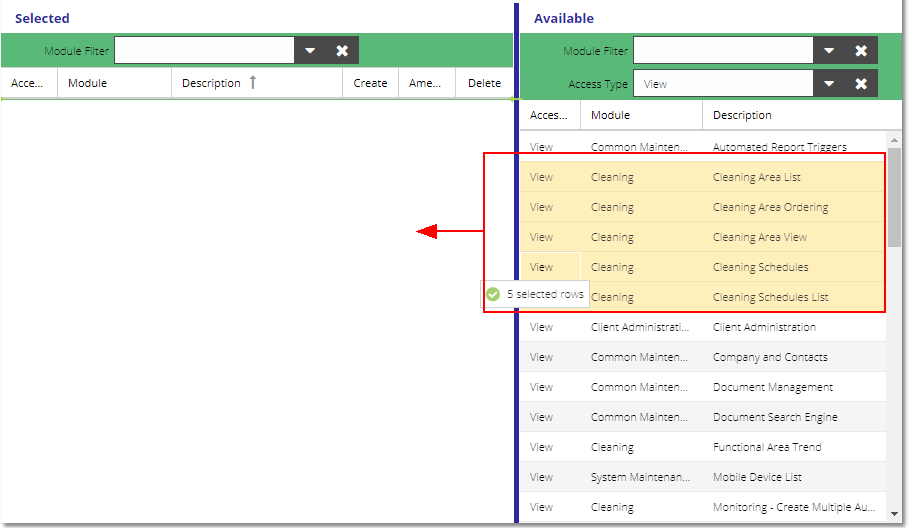
Drag
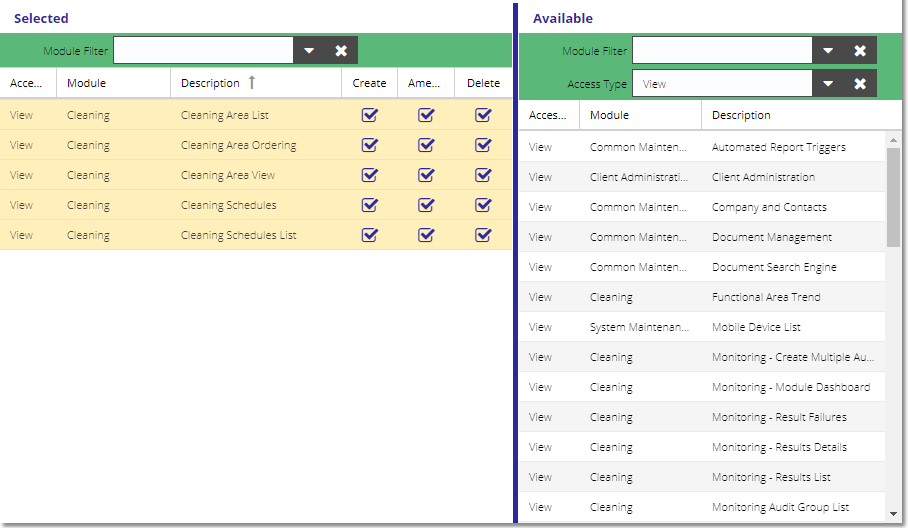
Drop
The selected rows from the Available list should disappear from the Available list and appear on the Selected list. The picture above demonstrates that the Staff record, now have access to 5 views:
▪Cleaning Area List View
▪Cleaning Area Ordering View
▪Cleaning Area View
▪Cleaning Schedules View
▪Cleaning Schedules List View
The same steps above can also be carried out on the Security Control view by following this: How to give user access from the Security Control view
Assigning the skills and groups against the Staff record
How to add a new skill or group option
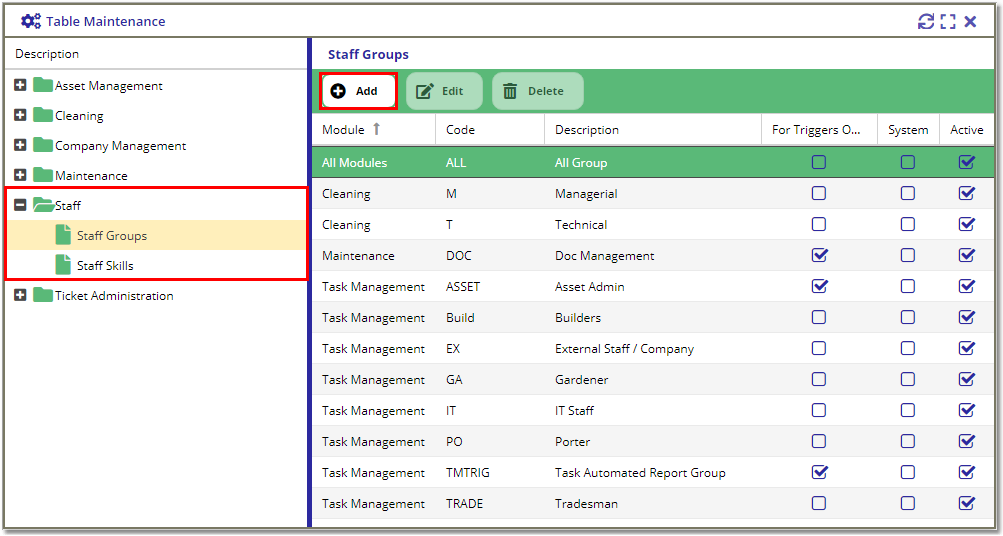
You can create the Staff Skill or Group options via Maintenance > Table Maintenance view. Expand Staff and select Staff Groups or Staff Skills from the Table Maintenance menu.
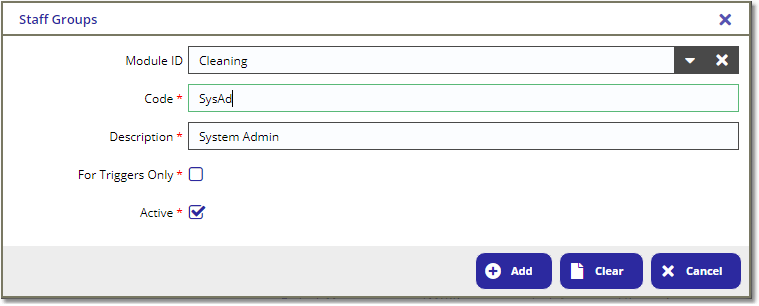
Click the Add button and type the new staff skill or group in the pop-up window.
Note, the Module field will serve as a filter to limit the Staff Group field options in the module views.
E.g. If you select the Cleaning module, then it means the selection option is only available from within the Cleaning module and will be hidden in the Task Management or Survey views in the application.
Assigning the skill/group to a staff record
Open the Staff > Staff Details view and find the Staff ID from the lookup to load the Staff record.
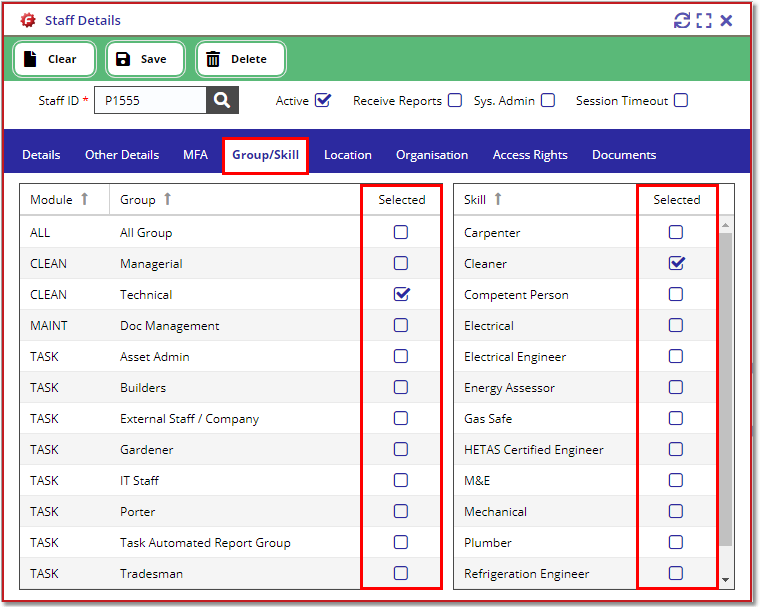
Once the staff record is loaded in the view, navigate to the Group/Skill tab and select the group / skill options from the grid by ticking the the relevant boxes:
Configuring Profile Constraints
How the constraints work
The system will allow you to specify global filters for a user so that they can create, amend, and delete records but during this process will only see the information for a functional area, organisation, and/or monitoring type that they are interested in.
Adding the profile constraints
To add the profile constraints, open the Menu > System Maintenance > Staff Constraints view.
Open the Staff Lookup by clicking on the search icon.
Select the Staff record to load on the form as displayed below:

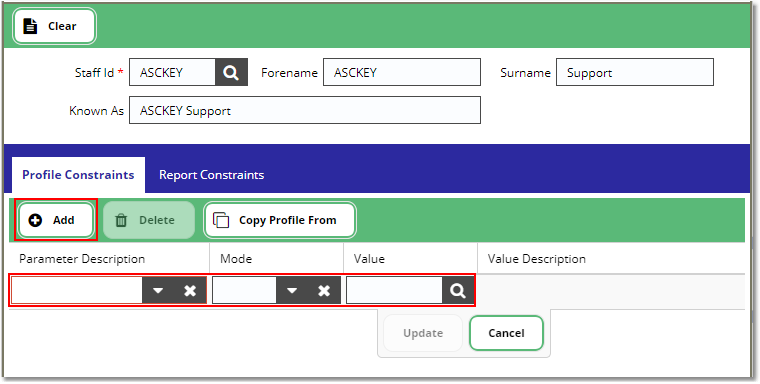
On the Profile Constraints tab, click on the Add button to add a new row on the grid and this will open a row editor.
Fill in the Parameter Description, Mode, and Value fields, then click on the [ Update ] button:
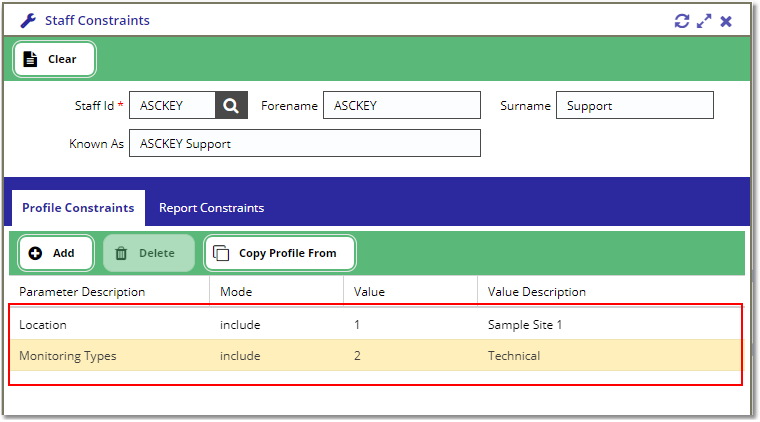
The above picture demonstrates that Staff ID ASC1000 have profile constraints on:
Location - include - Sample Site 1
Monitoring Types - include - Technical
This means for the whole system, Staff ID ASC1000 would only see data for Sample Site 1, and Technical Audits.
If you're setting up multiple users with the same profile constraints, load the Staff record (e.g. Staff ID ASC001) as described above, then click on the [ Copy Profile From ] button.
This will open another Staff Lookup where you can find a Staff record (e.g. Staff Id: ASC002) with the constraints already configured.
Selecting Staff Id ASC002 from the lookup will copy the selected Staff's profile constraints to Staff Id ASC001.
