|
This page will be all about creating a new physical location/organisation structure in the system. We will go through how to create a new location/organisation tier, how to add a new child tier to an existing tier (e.g. Add Block to a Site), how to move or clone a location/organisation, and how to configure the functional area risk. |
•Creating a new location/organisation
•How to add a child tier to an existing location/organisation (E.g. Add a new Block to a Site)
•How to move a location/organisation tier
•How to clone a location/organisation tier
•How to set up the location/organisation QR code fields
The structure tier is what we use to define the different levels of a building or site.
For Physical locations, the tiers can be set to:
Tier 0: Site
Tier 1: Block
Tier 2: Level
Tier 3: Functional Area
Which will be used to create the location records e.g.:
(0) Asckey Data Services / (1) Main Building / (2) Ground Floor / (3) WARD 001
(0) Asckey Data Services / (1) Main Building / (2) Ground Floor / (3) WARD 002
(0) Asckey Data Services / (1) Main Building / (2) Ground Floor / (3) WARD 003
(0) Asckey Data Services / (1) Main Building / (2) First Floor / (3) WARD 101
(0) Asckey Data Services / (1) Main Building / (2) First Floor / (3) WARD 102
(0) Asckey Data Services / (1) Main Building / (2) First Floor / (3) WARD 103
You can add or amend an existing tier description via Menu > Maintenance > Structure Configuration view:

Creating a new location/organisation
Note: We'll go through the process of creating a new location but the same steps can be repeated to create a new organisation tier.
To create a new location/organisation tier, go to Menu > Maintenance > Physical Locations view.
The view is divided into two sections, the first top section displays a list of the top tier (e.g. Site / Hospital / University) and the bottom section is a form where users can type in the new location/organisation details.
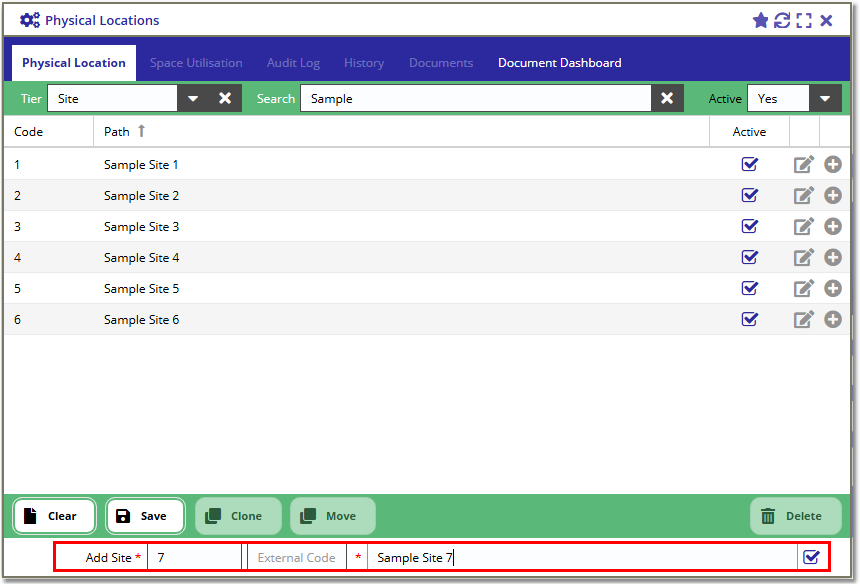
To create a new structure on the top tier (e.g. a new Site), make sure that there is no selected tier on the grid, if there is, press the [ Clear ] button until the form label says Add Site.
Fill in the Code (this will need to be unique per tier) and the Description field on the Form panel and click the [ Save ] button e.g.:
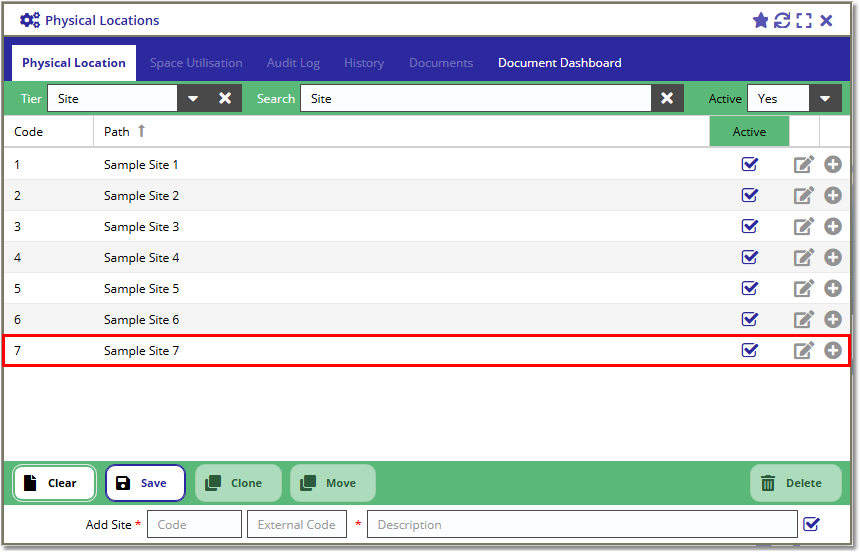
Once saved, the new Site location should appear on the Structure panel:
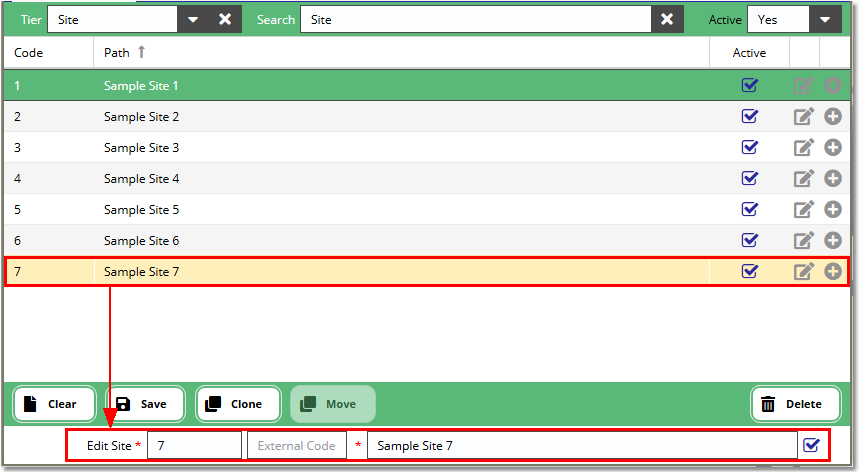
To update an existing tier's code or description, select the tier from the grid and this will load the record in the form and change the label to Edit Site / Block / Level / Area / etc.
How to add a child tier to an existing location/organisation (e.g. Add a new Block to a Site)
Note: We'll go through the process of adding a child tier to an existing location but the same steps can be repeated to add a new organisation child tier.
To add a new child tier (e.g. add a new Block to a Site), you have to click the + icon on the parent tier e.g. Sample Site 7 from the structure grid.
This will then change the label of the form below to Add Block (the name of the child tier).
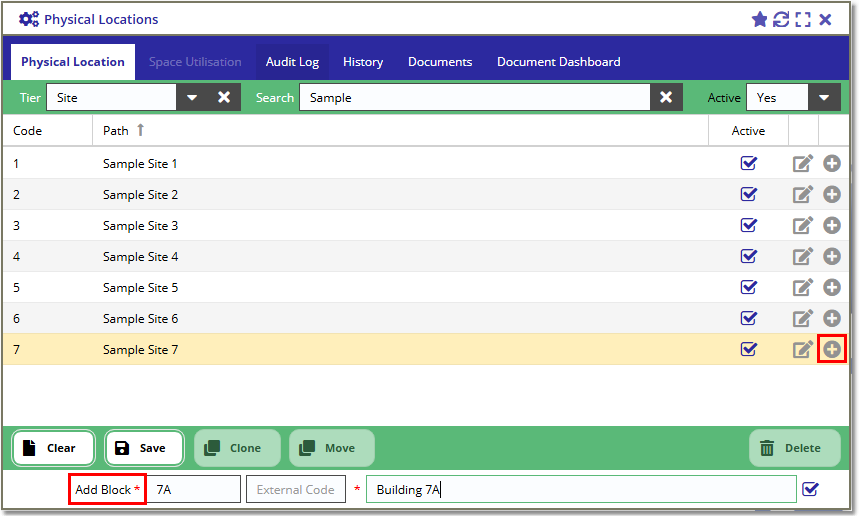
Fill in the form e.g. (Code: 7A, Description: Building 7A) and click the [ Save ] button.
Once saved, the new tier will be shown on the grid when you change the Tier filter to Building.
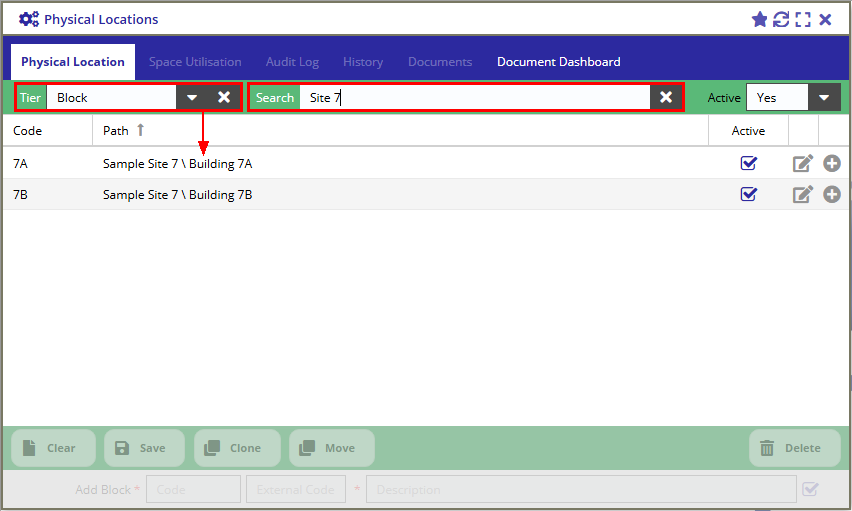
Repeat the process above to add the next tier. If you click the + icon on the block, this will change the form label to Add Level (name of the next tier).
How to move a location/organisation tier
Note: We'll go through the process of moving a location tier but the same steps can be repeated to move an organisation tier.
The user will need to have the Ability to Move Location/Organisation Tiers security permission to perform the steps below.
Please check the user's access rights via Staff Details > Access Rights.
Note, moving tier is not applicable to the parent-most tier e.g. Site as there's nowhere to move this to.
Find the child-location that you want to move. E.g. If you want to move a functional area, change the Tier filter at the top to Functional Area and locate the record.
You can use the Search bar to find the record based on the location path:
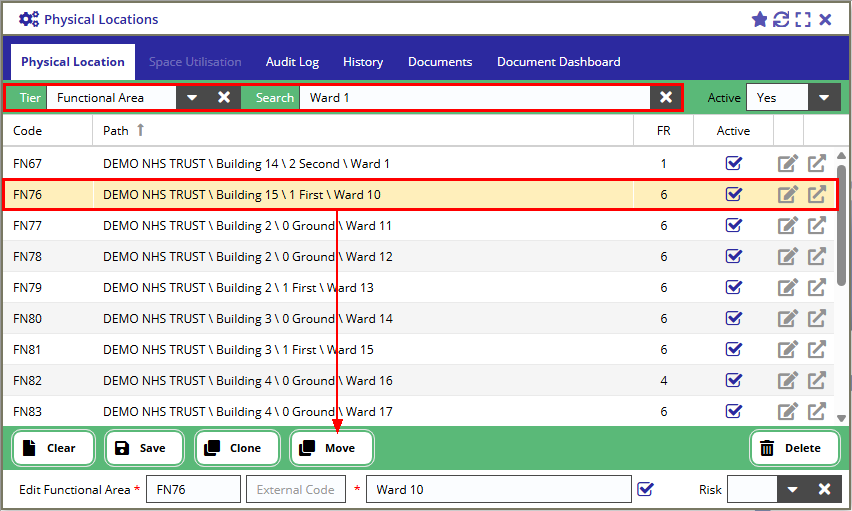
Once the record is selected, press the [ Move ] button to launch the pop-up window.
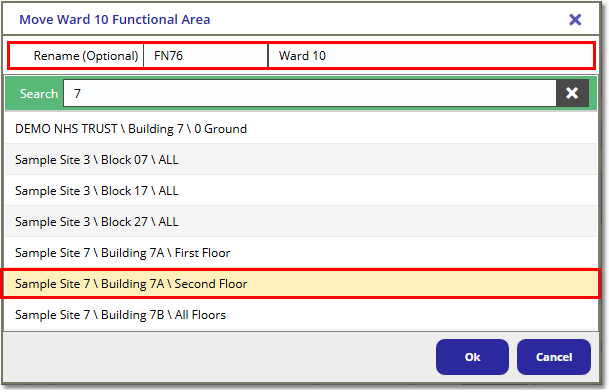
Find the tier you want to move the selected location to, in this case, it's the Level tier e.g. Sample Site 7 \ Building 7A \ Second Floor.
You will have the chance to rename the functional area from the top form but this is optional. Press the [ OK ] button to save.
There are a few rules that you need to remember when moving a tier to a different location. These are:
1. You can only move the selected tier against the same parent tier level e.g.:
If you want to move a Block (Tier 1), you can only move the selected Block to a Site (Tier 0) tier.
If you want to move a Functional Area (Tier 2), you can only move the selected Functional Area to a Block (Tier 1) tier.
2. The Code needs to be unique per tier e.g.:
Moving Sample Site 1/Block 01 (Code: 001) to Sample Site 2, but there's already a Block 1 (Code: 001) in Sample Site 2, the user will be asked to give the moving block another code e.g. 003.
Changing the Code to a different value e.g. 003, will avoid Code duplication in Sample Site 2. Click the [ Ok ] button on the prompt to save the changes.
001 - Block 01 will then disappear from Sample Site 1 and appear on Sample Site 2 with new Code 003.
How to clone a location/organisation tier
Note: We'll go through the process of cloning a location tier but the same steps can be repeated to clone an organisation tier.
The user will need to have the Ability to Clone Location/Organisation Tiers security permission to perform the steps below.
Please check the user's access rights via Staff Details > Access Rights.
Find the child-location that you want to clone. E.g. If you want to clone a block, change the Tier filter at the top to Block and locate the record.
You can use the Search bar to find the record based on the location path:
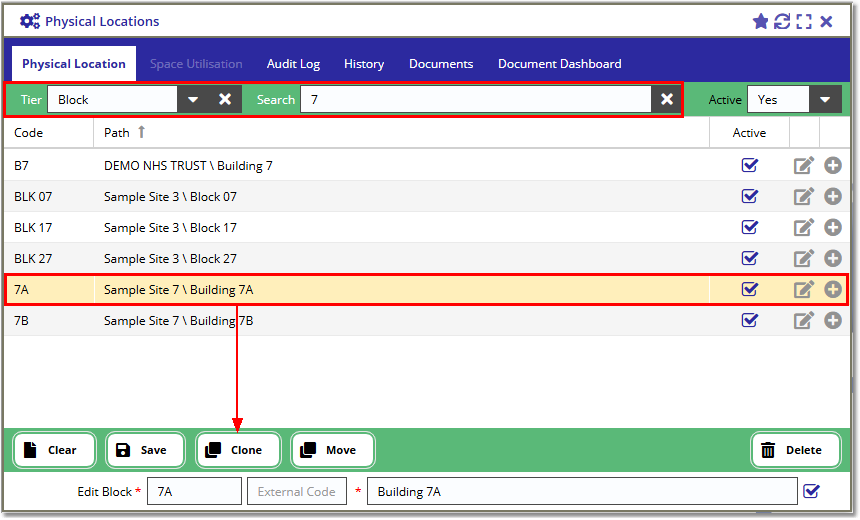
Once the record is selected, press the [ Clone ] button to launch the pop-up window.
Find the parent tier you want to put the cloned location to, for example in this case we will put the clone in the same parent tier as the original e.g. Sample Site 6.
You will have the chance to give a new code to the clone. Press the [ OK ] button to start the cloning process.
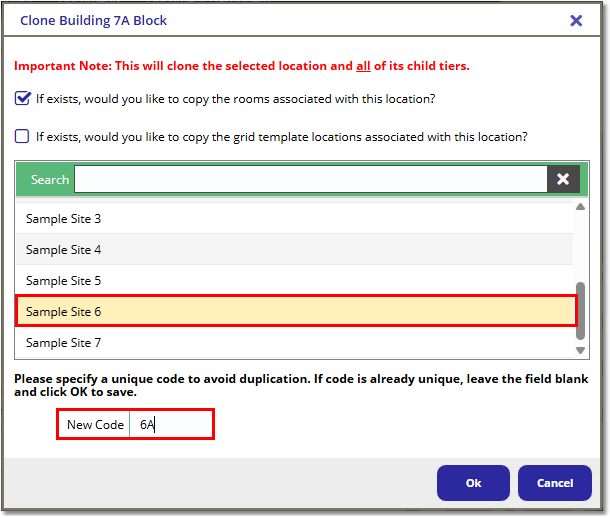
Prompt Details:
If exists, would you like to copy the cleaning areas associated with this location
|
For Cleaning module only: When checked, all of the rooms against the selected tier will also get cloned. If Block 3, has 3 functional areas e.g. (Ward 1, Ward 2, and Ward 3), all the rooms against the functional areas will also get cloned.
|
If exists, would you like to copy the grid template locations associated with this location?
|
For Survey module only: When checked, all of the Grid Template Locations against the selected tier will also get cloned.
|
Location List |
The list will show the available tiers where you can add your cloned location to.
e.g. If you select a Block (Tier 1), the location list will show all of the Sites (Tier 0) where you can assign the block that will get created during the cloning process. If you select a Functional Area (Tier 2), the location list will show all of the Blocks (Tier 1) in the system.
|
New Code |
Assign a new code to the selected tier.
|
The details on the form above means that the user wants to clone Sample Site 7 > Building 7A to Sample Site 6 with a new code of 6A, along with all the rooms in the block.
How to set up the Location/Organisation QR code
To configure the Location/Organisation QR code details, go to the Maintenance / Advanced Options view and navigate to the QR Code Fields tab.
Select the Physical Locations / Organisations tab, this will show you the available data fields for the Location / Organisation records e.g.:
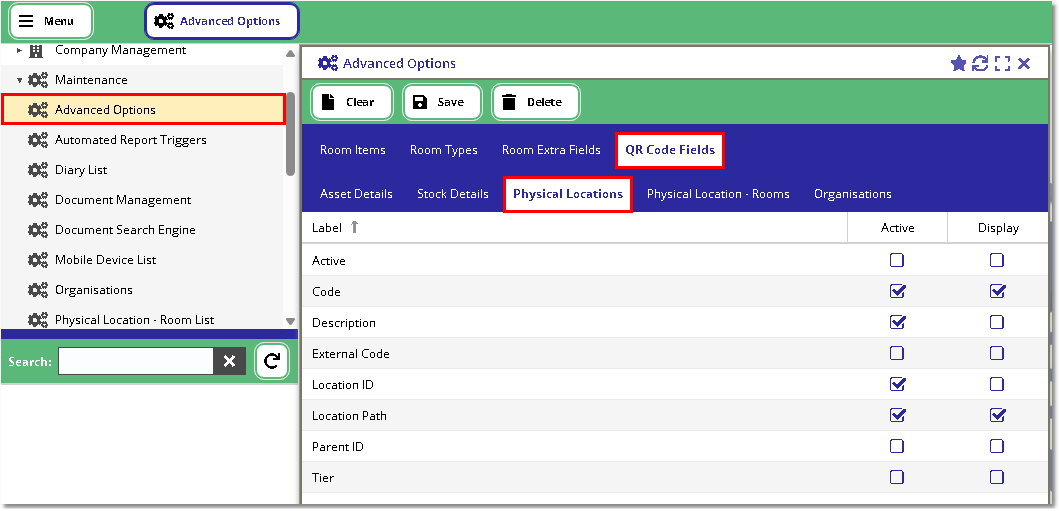
Tick the Active box if you want the information added on the QR Code.
Tick the Display box if you want the field data written out next to the QR Code.
For example, the above shows that Code, Description, Location ID, and Location Path fields are Active with Code and Location Path in the Display which will generate the following QR code:
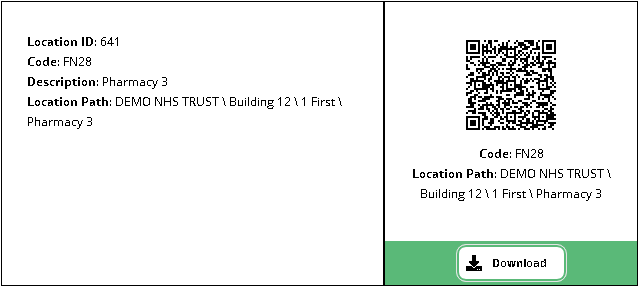
The information on the left is what the device reads when you scan the QR code.
Important Note: If you want to use the QR code in fmfirst-cloud mobile, it is important that the Location ID field is active.
The ID field is what the application use to search the Location / Organisation records.
To generate the QR Code, go to the Physical Locations / Organisations view and go to the QR Code tab.
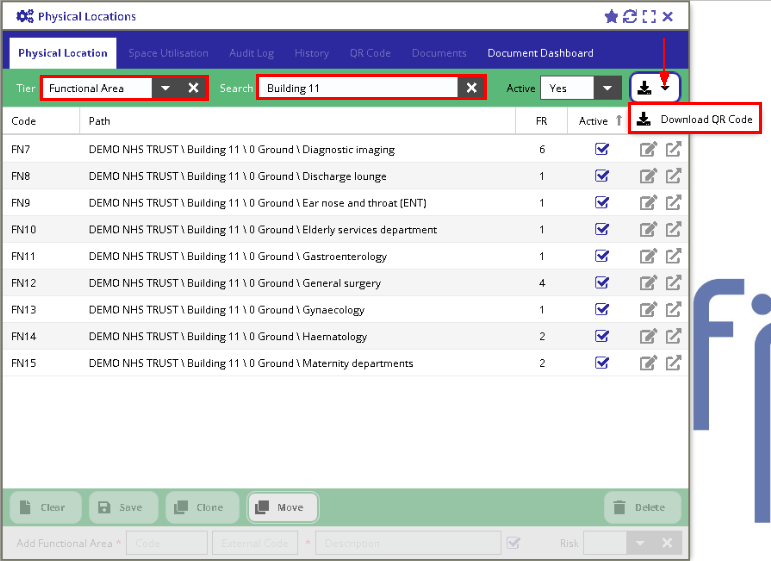
To generate the QR Code for multiple location/organisations, go to the Physical Location view, change the tier to e.g. Functional Area, apply Search filters and press the Download button e.g.:
